
My obsession with earrings and jewelry started at a very young age. Although I was a massive tom-boy, from the moment I was able to try on my mom’s necklace’s I knew I would end up purchasing tons of jewelry in my life. As I became a “woman” all my family members purchased jewelry boxes for me that were appropriate for my age. However, these jewelery boxes were more fun to play with as and less useful for storage purposes. I have had them all! Heavy wood bulky jewelry boxes to jewelry tree’s. I even had the pink one with the little ballerina that danced to the nutcracker. I was left with the dismal task of throwing away pieces I did not wear often to make room for new jewelry to fit in these boxes with thin drawers and no space!

I found a quick and easy way to fix this dilemma that requires very little effort, and allows for me to display my jewelry so I can actually see what I have, save counter space, and reuse an old frame that I never used.
Here is what you will need:
-Photo -Frame any size. I used a 11 x 14 in frame from Dick Blick Art Store I feel longer frames work best for long necklaces
-Thin gauge wire mesh. The higher the gauge the better. I bought mine from a local hardware store but I am sure you can find it any craft shop. Make sure it is a stiff mesh and not the molding kind otherwise it will not hold your Jewelry firm.
-Staple gun & Light duty staples
-Needle nose pliers
-Tin snips optional if your pliers do not have a cutting option in the center.
1. Remove the glass and cardboard backing for your photo frame, so you are left with just the wooden frame itself.

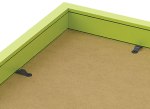

2. Then take your wire mesh and cut to the size of your frame. Make sure the mesh is taught.


2. Take your staple gun and staple your mesh to the back of the frame. Since my frame has a small lip and is on the deeper side, I chose to staple the mesh to the inside instead of the frame.

3. Take small pieces of wire and bend them into an “S” shape to hang your jewelry.


4. Use command strips to hang to your wall!
That’s it! A very simple and easy way to organize your jewelry! Get Crafting!

